Wednesday, August 17, 2011
Help me out!
Hey there! This is my jailbreaking site which has up to date methods on how to jailbreak! If you find this site helpful please click on a ad for me (I'm on Google Adsense.) which will earn me about $.30 every time I get someone to click on a ad. Thanks and enjoy the site!
Monday, August 15, 2011
Jailbreak 4.3.5 iOS
Note: Those relying on a carrier unlock must stay away from Redsn0w.
How to Jailbreak iOS 4.3.5 (Tethered)
Step 1: Download iOS 4.3.5 and iOS 4.3.4 (required by this version of Redsn0w) firmware file for your device from the links given at the end.
Step 2: Download Redsn0w 0.9.8b4 for Windows or Mac. Also make sure you are running the latest version of iTunes, which is version 10.4.
Step 3: Now start Redsn0w, browse for the iOS 4.3.4 firmware file (NOT the 4.3.5) that you downloaded in Step 1 and point it towards Redsn0w. Refer to the screenshots below:


Step 4: Once Redsn0w is done recognizing the firmware file, click Next and there you’ll be taken to a new window. Simply check the “Install Cydia” box as shown below and leave other options as it is for now. Once done, click Next.

Step 5: On this screen, Redsn0w will instruct you to power down your device and plug it in to your computer. Follow the onscreen instructions and then click Next to continue.

Step 6: On this screen you will have to put your device in DFU mode with a combination of the Power button and the Home button for a certain amount of time, simply follow the onscreen instructions on how to do so. The combination is usually like this:

Step 7: Redsn0w will now jailbreak your device, don’t do anything weird at this point, just let Redsn0w finish. We would recommend that you don’t do anything with your PC or Mac at all during the process. Sitting idle and waiting for the process to end on its own is much advised.
Since this is a tethered jailbreak, therefore whenever your iOS device loses power, it will go into the dreaded Apple logo boot screen loop. To get out of that, simply start from Step 3 again and in Step 4, uncheck “Install Cydia” and instead check “Just boot tethered right now” option and hit “Next” with your iPhone, iPad or iPod touch connected to your PC or Mac. And yes, you will have to do this every time when your device reboots or loses power.

That’s it! You should now have a jailbroken iPhone, iPad, or iPod touch running iOS 4.3.5.
Download iOS 4.3.5 for iPhone 4, 3GS, iPod touch and iPad
Download iOS 4.3.4 for iPhone 4, 3GS, iPad, iPod touch
Download Redsn0w 0.9.8b4 for Windows
Download Redsn0w 0.9.8b4 for Mac
Download iTunes 10.4 for Windows & Mac
How to Jailbreak iOS 4.3.5 (Tethered)
Step 1: Download iOS 4.3.5 and iOS 4.3.4 (required by this version of Redsn0w) firmware file for your device from the links given at the end.
Step 2: Download Redsn0w 0.9.8b4 for Windows or Mac. Also make sure you are running the latest version of iTunes, which is version 10.4.
Step 3: Now start Redsn0w, browse for the iOS 4.3.4 firmware file (NOT the 4.3.5) that you downloaded in Step 1 and point it towards Redsn0w. Refer to the screenshots below:
Step 4: Once Redsn0w is done recognizing the firmware file, click Next and there you’ll be taken to a new window. Simply check the “Install Cydia” box as shown below and leave other options as it is for now. Once done, click Next.
Step 5: On this screen, Redsn0w will instruct you to power down your device and plug it in to your computer. Follow the onscreen instructions and then click Next to continue.
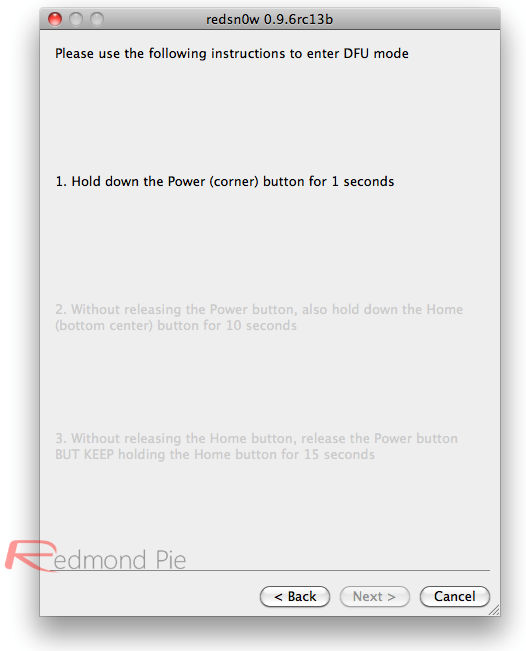
Step 6: On this screen you will have to put your device in DFU mode with a combination of the Power button and the Home button for a certain amount of time, simply follow the onscreen instructions on how to do so. The combination is usually like this:
- Hold down Power button for 5 seconds.
- Now without releasing the Power button, hold down the Home button simultaneously with the Power button for 10 seconds.
- Let go of the Power button but keep on holding the Home button for another 15 seconds.
Step 7: Redsn0w will now jailbreak your device, don’t do anything weird at this point, just let Redsn0w finish. We would recommend that you don’t do anything with your PC or Mac at all during the process. Sitting idle and waiting for the process to end on its own is much advised.
Since this is a tethered jailbreak, therefore whenever your iOS device loses power, it will go into the dreaded Apple logo boot screen loop. To get out of that, simply start from Step 3 again and in Step 4, uncheck “Install Cydia” and instead check “Just boot tethered right now” option and hit “Next” with your iPhone, iPad or iPod touch connected to your PC or Mac. And yes, you will have to do this every time when your device reboots or loses power.
That’s it! You should now have a jailbroken iPhone, iPad, or iPod touch running iOS 4.3.5.
Download iOS 4.3.5 for iPhone 4, 3GS, iPod touch and iPad
Download iOS 4.3.4 for iPhone 4, 3GS, iPad, iPod touch
Download Redsn0w 0.9.8b4 for Windows
Download Redsn0w 0.9.8b4 for Mac
Download iTunes 10.4 for Windows & Mac
Jailbreak 4.3.4 iOS
Apple has just pushed out iOS 4.3.4 for the iPhone, iPad and the iPod touch. And thankfully, we have cooked custom PwnageTool bundles which allows you to jailbreak any device (except for iPad 2) running iOS 4.3.4, and at the same time preserve your baseband for an Ultrasn0w unlock later on.
")
We have tested and can 100% confirm that they are working. Keep in mind that the jailbreak is tethered for now, in other words, if your device loses power or restarts then you would have to boot it into the jailbroken state again. No matter how annoying it may sound, but its better than having no jailbreak at all.

Things you’ll need:
Step 1: Download the custom PwnageTool bundle for iPhone 4 from this link. (Please DO NOT hotlink this file. These bundles have been created by Redmond Pie. Credit the original source. Thanks)
Extract the .zip on your desktop, and inside it you should see a .bundle file. For this guide we’re going to use the iPhone 4 bundle, you should choose the one that applies to your device. Move the .bundle file to your desktop.
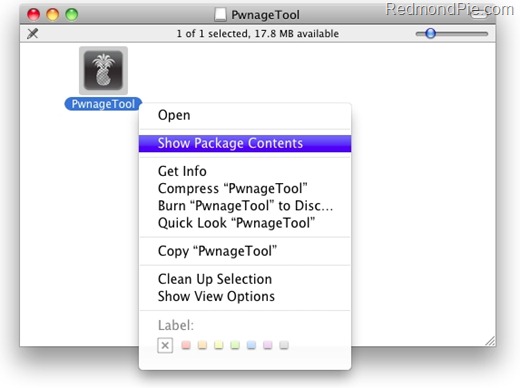
Step 2: Download PwnageTool 4.3.3 and then copy it to the /Applications directory. Right click on the PwnageTool icon and then click on Show Package Contents. Refer to the screenshot below if you’re having confusion:
Step 3: Now you’re going to navigate to the following address: Contents/Resources/FirmwareBundles/ and paste the .bundle file which you copied to your desktop in this location.

Build Custom iOS 4.3.4 Firmware
Step 4: Download iOS 4.3.4 from this link tailored for your iOS device and save it on your desktop.
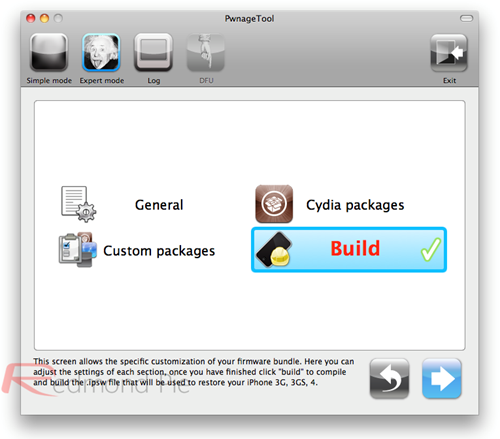
Step 5: Fire up PwnageTool in Expert mode and select your device as show in the screenshot below:

Step 6: Now you’re going to browse for the iOS 4.3.4 firmware for your device, direct it to the location where you downloaded the iOS 4.3.4 file.

Step 7: Now click on Build.
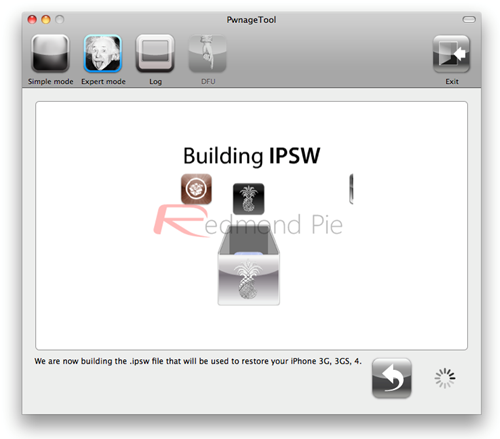
 Step 8: PwnageTool will now create a jailbroken IPSW firmware file for your iOS device.
Step 9: Now you’re going to put your iOS device in DFU mode, follow the on screen steps on how to do so, they are as follows:

Restore Your Device to iOS 4.3.4 Using iTunes
Step 10: Start up iTunes on your Mac and select your device from the sidebar on the left. Hold down the “alt” key on your keyboard and click on “Restore”, do not press “Update” or “Check for Update”.

Now a pop up window will appear, simply guide it to the jailbroken custom iOS 4.3.4 file which was created by PwnageTool, then click Open.
Step 11: From this point onwards, iTunes will do its thing and restore your device to the jailbroken iOS 4.3.4 custom firmware file. Don’t do anything crazy at this point, just let iTunes complete its job. When everything is done, your device will boot up into a custom jailbroken version of iOS 4.3.4.
How to Boot Tethered?
Since this is not a tethered jailbreak therefore you have to boot into the jailbroken state every time your device loses power. Simply follow the steps given below on how to do so using “tetheredboot” utility.
Step 12: Download the tetheredboot utility from this link. Extract the zip file.
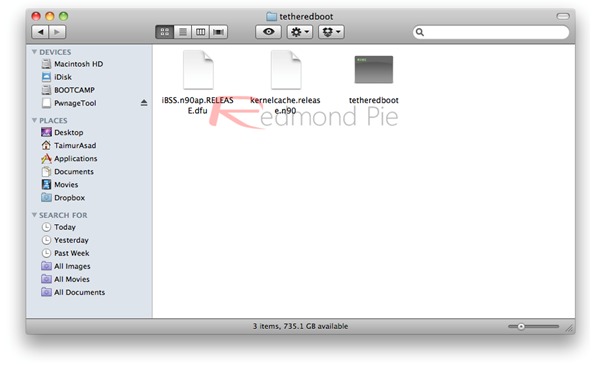
Step 13: Make a copy of the custom iOS 4.3.4 firmware file which you created, rename it to .zip instead of .ipsw. And extract the file. We need two files from the extracted zip file, kernelcache.release.n90 and iBSS.n90ap.RELEASE.dfu.
Copy both these files under the location /Firmware/dfu/ from the custom iOS 4.3.4 firmware file. Now move them to the directory where the tetheredboot utility is lying, refer to the screenshot below:
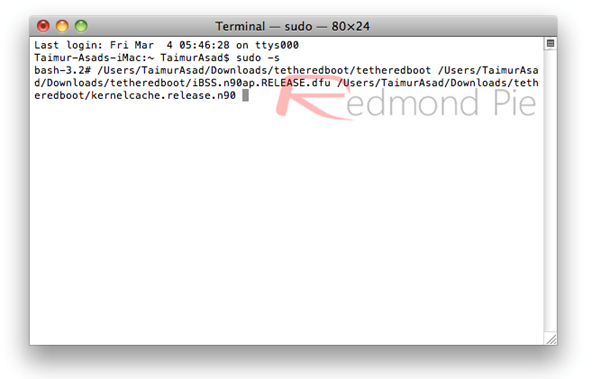
Step 14: Turn off your iPhone, start Terminal on your Mac and type in the following commands:
Hit Enter key.
In case if the above doesn’t work, then try the following:
You will now see some code running in Terminal and in a short while, it will ask you to put your device in DFU mode, you can do so by following the steps given below:
We have tested and can 100% confirm that they are working. Keep in mind that the jailbreak is tethered for now, in other words, if your device loses power or restarts then you would have to boot it into the jailbroken state again. No matter how annoying it may sound, but its better than having no jailbreak at all.
Cydia, running on iPhone 4 GSM, iOS 4.3.4
The neat thing about PwnageTool is that it allows you to preserve your iPhone’s baseband, which aids in unlocking your iPhone later on using Ultrasn0w unlock. In this guide we’ll show you how you can jailbreak your iPhone on iOS 4.2.4, preserve your baseband and unlock it with Ultrasn0w, let’s get to it!Things you’ll need:
- PwnageTool 4.3.3
- iOS 4.3.4 firmware
- iTunes 10.3.1
- Mac OS X
- PwnageTool bundles for iOS 4.3.4
- tetheredboot utility
- There is no unlock for iOS 4.3.4’s baseband, hence do not hit the update button in iTunes if you rely on a carrier unlock.
- Your baseband will be preserved during the whole process.
- This jailbreak is semi-tethered.
- Hacktivation is fully supported
Step 1: Download the custom PwnageTool bundle for iPhone 4 from this link. (Please DO NOT hotlink this file. These bundles have been created by Redmond Pie. Credit the original source. Thanks)
Extract the .zip on your desktop, and inside it you should see a .bundle file. For this guide we’re going to use the iPhone 4 bundle, you should choose the one that applies to your device. Move the .bundle file to your desktop.
Step 2: Download PwnageTool 4.3.3 and then copy it to the /Applications directory. Right click on the PwnageTool icon and then click on Show Package Contents. Refer to the screenshot below if you’re having confusion:
Step 3: Now you’re going to navigate to the following address: Contents/Resources/FirmwareBundles/ and paste the .bundle file which you copied to your desktop in this location.
Build Custom iOS 4.3.4 Firmware
Step 4: Download iOS 4.3.4 from this link tailored for your iOS device and save it on your desktop.
Step 5: Fire up PwnageTool in Expert mode and select your device as show in the screenshot below:
Step 6: Now you’re going to browse for the iOS 4.3.4 firmware for your device, direct it to the location where you downloaded the iOS 4.3.4 file.
Step 7: Now click on Build.
Step 9: Now you’re going to put your iOS device in DFU mode, follow the on screen steps on how to do so, they are as follows:
- Hold down the Power and Home buttons simultaneously for 10 seconds.
- Let go of the Power button but keep on holding the Home button for 10 seconds.
- If you followed the steps correctly, then you’re in DFU mode.
Restore Your Device to iOS 4.3.4 Using iTunes
Step 10: Start up iTunes on your Mac and select your device from the sidebar on the left. Hold down the “alt” key on your keyboard and click on “Restore”, do not press “Update” or “Check for Update”.
Now a pop up window will appear, simply guide it to the jailbroken custom iOS 4.3.4 file which was created by PwnageTool, then click Open.
Step 11: From this point onwards, iTunes will do its thing and restore your device to the jailbroken iOS 4.3.4 custom firmware file. Don’t do anything crazy at this point, just let iTunes complete its job. When everything is done, your device will boot up into a custom jailbroken version of iOS 4.3.4.
How to Boot Tethered?
Since this is not a tethered jailbreak therefore you have to boot into the jailbroken state every time your device loses power. Simply follow the steps given below on how to do so using “tetheredboot” utility.
Step 12: Download the tetheredboot utility from this link. Extract the zip file.
Step 13: Make a copy of the custom iOS 4.3.4 firmware file which you created, rename it to .zip instead of .ipsw. And extract the file. We need two files from the extracted zip file, kernelcache.release.n90 and iBSS.n90ap.RELEASE.dfu.
Copy both these files under the location /Firmware/dfu/ from the custom iOS 4.3.4 firmware file. Now move them to the directory where the tetheredboot utility is lying, refer to the screenshot below:
Step 14: Turn off your iPhone, start Terminal on your Mac and type in the following commands:
sudo –sEnter your administrator password, whatever that might be, then type the following:
/Users/TaimurAsad/Desktop/tetheredboot/tetheredbootThe commands might be a different on your Mac, replace “TaimurAsad” with the name of the user directory on your Mac accordingly.
/Users/TaimurAsad/Desktop/tetheredboot/iBSS.n90ap.RELEASE.dfu
/Users/TaimurAsad/Desktop/tetheredboot/kernelcache.release.n90
Hit Enter key.
In case if the above doesn’t work, then try the following:
/Users/TaimurAsad/Desktop/tetheredboot/tetheredboot –iQuick tip: Drag and drop the tetheredboot file, the iBSS file and then the kernelcache.release file into Terminal.
/Users/TaimurAsad/Desktop/tetheredboot/iBSS.n90ap.RELEASE.dfu -k
/Users/TaimurAsad/Desktop/tetheredboot/kernelcache.release.n90
You will now see some code running in Terminal and in a short while, it will ask you to put your device in DFU mode, you can do so by following the steps given below:
- Hold down the Power and Home buttons simultaneously for 10 seconds.
- Let go of the Power button but keep on holding the Home button for 10 seconds.
- If you followed the steps correctly, then you’re in DFU mode.
How to jailbreak iOS 4.3.3
Today’s PwnageTool and redsn0w incorporate @i0n1c’s port to 4.3.3 (it’s ironic that such a long-lasting untether doesn’t even have an official name!). It also of course uses geohot’s limera1n bootrom exploit to inject the jailbreak. The 4.3.3 untether works on all devices that actually support 4.3.3 except for the iPad2:
")
Earlier this week, iOS 4.3.3 was released to fix the much talked about iOS location tracking bug.
 Cydia running on iOS 4.3.3, iPhone 4 (GSM)NOTE: Those of you who rely on a carrier unlock MUST STAY AWAY from Redsn0w and stock iOS 4.3.3 firmware. Instead use PwnageTool for Mac, or Sn0wbreeze for Windows.
Step 1: Download iOS 4.3.3 for your version of iOS device.
Step 2: Update/Restore to iOS 4.3.3 firmware using the IPSW file you just downloaded via iTunes 10.2.2.
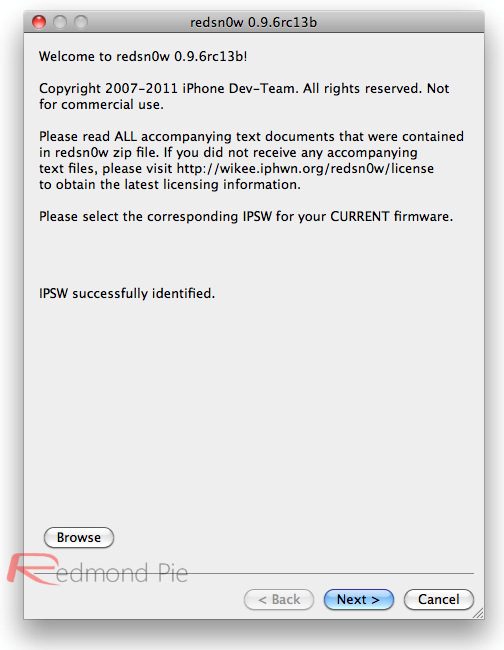
Step 3: Start Redsn0w and point it to the official iOS 4.3.3 firmware file.
")
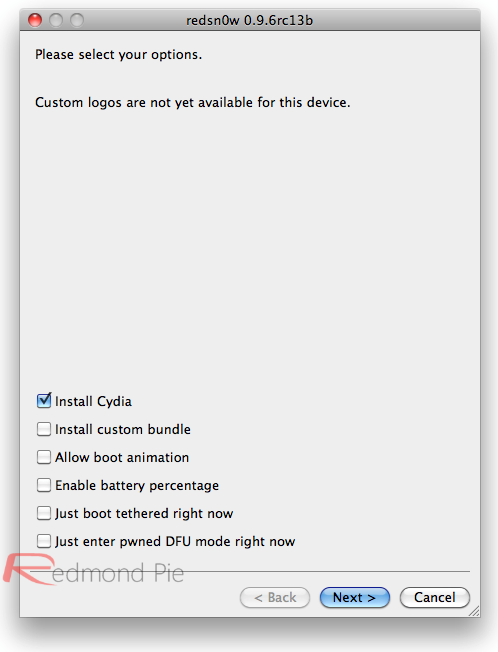
Step 4: Now select “Install Cydia” and click “Next”. Optionally (if available), you can also select any other option you like.
Step 5: Now make sure your device is both OFF and PLUGGED IN to the computer before you click “Next”.
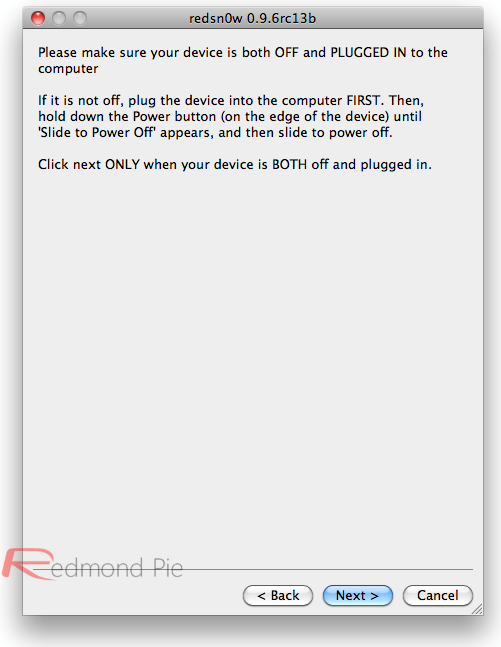
At this stage you will be presented with a screen where you will be guided on how to enter DFU mode. Quickly hold “Power” button and then while holding the “Power” button, you will now have to hold “Home” button too. Now after few seconds release “Power” button but keep holding “Home” button until installation begins.
Step 6: Sit back and enjoy while Redsn0w does the rest for you. Once done, your iPhone, iPad or iPod touch will restart automatically and you will find it fully jailbroken (untethered) on the latest iOS 4.3.3 firmware.
- iPhone3GS
- iPhone4 (GSM)
- iPod touch 3G
- iPod touch 4G
- iPad1
- AppleTV2G (v4.3 8F202)
Earlier this week, iOS 4.3.3 was released to fix the much talked about iOS location tracking bug.
Cydia running on iOS 4.3.3, iPhone 4 (GSM)Step 1: Download iOS 4.3.3 for your version of iOS device.
Step 2: Update/Restore to iOS 4.3.3 firmware using the IPSW file you just downloaded via iTunes 10.2.2.
Step 3: Start Redsn0w and point it to the official iOS 4.3.3 firmware file.
Step 4: Now select “Install Cydia” and click “Next”. Optionally (if available), you can also select any other option you like.
Step 5: Now make sure your device is both OFF and PLUGGED IN to the computer before you click “Next”.
At this stage you will be presented with a screen where you will be guided on how to enter DFU mode. Quickly hold “Power” button and then while holding the “Power” button, you will now have to hold “Home” button too. Now after few seconds release “Power” button but keep holding “Home” button until installation begins.
Step 6: Sit back and enjoy while Redsn0w does the rest for you. Once done, your iPhone, iPad or iPod touch will restart automatically and you will find it fully jailbroken (untethered) on the latest iOS 4.3.3 firmware.
GREENPOIS0N for 4.1 and 4.1.2

Greenpois0n Downloads
For iOS Firmware 4.2.1:
Greenpois0n RC6.1- Win - Download (MD5: 99e9082c3b482d02978afbabb20bd1e9)
- MacOSX - Download (MD5: 57ec49739b2c3d2a991e83f1e2738115)
For iOS Firmware 4.1:
Greenpois0n RC4- Win – Download (MD5: 4fdd558f94b5fdd06d50d6bad31c55ba)
- MacOSX – Download (MD5: bdcc6aa6617a5a67309e2e0afe049447)
- Linux (RC3.3) – Download (MD5: 73c75297a4ba1dec69f15a38f462dbf5)
How To Use Greenpois0n – The Quick Guide
- Remember greenpois0n is not and unlock it is a jailbreak (if you are unsure of the difference, stop now and become friends with google)
- Download and extract greenpois0n from the .zip and start greenpois0n.
- Attach your iPhone, iPad or iPod to your computer and click ‘Jailbreak’.
- Greenpois0n will now commence its DFU guide, if you know how to put your device into ‘DFU Mode’ you can do this at your own speed and greenpois0n will acknowledge a successful DFU operation.
- Press ‘Jailbreak’ and let greenpois0n do its thing, you will see wonderful lines of text scroll on your screen to assure you that something is happening.
- After a few seconds greenpois0n will display a ‘complete’ message, the greenpois0n injection is complete and wait for your device to reboot automatically.
- Once your device has rebooted make sure you have an active internet connection, locate and press the ‘Loader’ icon on your device, this will download cydia and install it for you, once it has done this your device needs to reboot one more time.
- Your done! Enjoy

How to Jailbreak iPads iPhones and iPods on version 3.1.2; 3.1.3 or 3.2
Spirit
What's Spirit?
- Spirit is an untethered jailbreak for iPad, iPhone, and iPod touch on certain firmware versions.
- Spirit is not a carrier unlock.
- If you currently are using a tethered jailbreak, you have to restore to use Spirit. Do not upgrade if you use an unlock on an iPhone 3G or 3GS. (You can, however, restore to 3.1.2 if you have SHSH blobs for that version.)
- (If you mistakenly ran Spirit despite using a tethered jailbreak, try these instructions.)
Requirements
- Any iPad, iPhone, or iPod touch on firmware 3.1.2, 3.1.3, or 3.2 (not 3.2.1).
- An activated device: one not stuck on the Connect to iTunes or Emergency Call screen.
- Any version of iTunes 9 earlier than 9.2
- Syncing with iTunes before trying this is highly recommended.
Download
Can You Jailbreak iPod Touch? Answer this Question Once and for All
Would you like to answer the perennial question – can you jailbreak iPod Touch? Non-techies might find it hard to see beyond their belief that iPod Touch is just a simpler version of the iPhone yet those who know better would say that they are about the same, the difference just being the iPhone’s cellular transceiver.
Unsurprisingly, iPod Touch’s home screen looks so much like an iPhone’s, only it has fewer icons – this is, of course, up until the time you install additional apps. iPod and iPhone have these things in common –
• First, you need to have your iPod Touch running on 1.1.3. or 1.1.4 firmware.
• You also need to ascertain that the software you will use is compatible with the operating system that your device has.
• If you are presently using a jailbroken device, then you should restore your iPod Touch with the use of iTunes.
• Next, download iPod’s firmware file in the ipsw format. Take note that the latest version of firmware is 4.3.2. If you have a third generation iPod Touch, then you can download the firmware from this link: http://appldnld.apple.com/iPhone4/041-0667.20110414.95hVL/iPod3,1_4.3.2_8H7_Restore.ipsw
• Fourth generation iPod Touch can make use of this URL: http://appldnld.apple.com/iPhone4/041-0666.20110414.3QvM1/iPod4,1_4.3.2_8H7_Restore.ipsw
• With iPhone 4, you can make use of this URL: http://appldnld.apple.com/iPhone4/041-0662.20110414.byQ84/iPhone3,1_4.3.2_8H7_Restore.ipsw
• After downloading the firmware, it’s time to download redsn0w at this link: http://www.quickpwn.com/redsn0w
• Save both files (firmware and software) to a desktop folder.
• Just run redsn0w and then follow the promptings that are shown on your screen. Begin by backing up your device with iTunes. As soon as iTunes recognizes your device, hold down the Option key and then click on Restore.
• Open the redsn0w app and then click on the Browser button and search for the firmware file you downloaded earlier.
• Open the zip file and then click on Next.
• Select the options that you would want for jailbreaking then click on Next once more.
• Put your iPod in DFU mode, after which the device would reboot on its own. Don’t stop this process from happening. Your device has to restart in order to begin the jailbreaking process.
• This should begin the jailbreaking process and after that, just relax and the software would do everything for you.
• After the process is complete, you should already have a jailbroken device. Enjoy!
These steps are still difficult for most people to understand. If you’re one of these individuals, you need a reliable software solution that can do everything for you in just a few minutes:
This is the leading software of its kind in the industry so it would be safe to trust in it. Whether you have the earliest or the latest model of iPod, you will still be able to jailbreak it to make room for more apps. Over a hundred thousand clients are happy with this software so you should be, too!
Have your iPod jailbroken in the safest and most correct means. Visit: Jailbreak iPod Touch Software.
If you’re tired of being confined to the apps that Apple approves, then know that you can always break free. There are so many features yet to discover, all you have to do is download and you will have a jailbroken iPod device in just minutes! Visit: Can You Jailbreak iPod Touch
Unsurprisingly, iPod Touch’s home screen looks so much like an iPhone’s, only it has fewer icons – this is, of course, up until the time you install additional apps. iPod and iPhone have these things in common –
- Two types of camera with one facing forward and the other facing the rear.
- 32 or 64 GB Flash memory
- Wi-Fi capabilities
- Safari web browser
- Photo, video and audio storage and playback
- YouTube video player
- Clock and calculator apps
- Calendar and contacts that are in sync with your PC
- Through Wi-Fi, be able to access iTunes Music Store
- About 250,000 apps that can be installed from App Store through Wi-Fi or any wired PC connection.
- Earphones with microphone and remote controls
• First, you need to have your iPod Touch running on 1.1.3. or 1.1.4 firmware.
• You also need to ascertain that the software you will use is compatible with the operating system that your device has.
• If you are presently using a jailbroken device, then you should restore your iPod Touch with the use of iTunes.
• Next, download iPod’s firmware file in the ipsw format. Take note that the latest version of firmware is 4.3.2. If you have a third generation iPod Touch, then you can download the firmware from this link: http://appldnld.apple.com/iPhone4/041-0667.20110414.95hVL/iPod3,1_4.3.2_8H7_Restore.ipsw
• Fourth generation iPod Touch can make use of this URL: http://appldnld.apple.com/iPhone4/041-0666.20110414.3QvM1/iPod4,1_4.3.2_8H7_Restore.ipsw
• With iPhone 4, you can make use of this URL: http://appldnld.apple.com/iPhone4/041-0662.20110414.byQ84/iPhone3,1_4.3.2_8H7_Restore.ipsw
• After downloading the firmware, it’s time to download redsn0w at this link: http://www.quickpwn.com/redsn0w
• Save both files (firmware and software) to a desktop folder.
• Just run redsn0w and then follow the promptings that are shown on your screen. Begin by backing up your device with iTunes. As soon as iTunes recognizes your device, hold down the Option key and then click on Restore.
• Open the redsn0w app and then click on the Browser button and search for the firmware file you downloaded earlier.
• Open the zip file and then click on Next.
• Select the options that you would want for jailbreaking then click on Next once more.
• Put your iPod in DFU mode, after which the device would reboot on its own. Don’t stop this process from happening. Your device has to restart in order to begin the jailbreaking process.
• This should begin the jailbreaking process and after that, just relax and the software would do everything for you.
• After the process is complete, you should already have a jailbroken device. Enjoy!
These steps are still difficult for most people to understand. If you’re one of these individuals, you need a reliable software solution that can do everything for you in just a few minutes:
This is the leading software of its kind in the industry so it would be safe to trust in it. Whether you have the earliest or the latest model of iPod, you will still be able to jailbreak it to make room for more apps. Over a hundred thousand clients are happy with this software so you should be, too!
Have your iPod jailbroken in the safest and most correct means. Visit: Jailbreak iPod Touch Software.
If you’re tired of being confined to the apps that Apple approves, then know that you can always break free. There are so many features yet to discover, all you have to do is download and you will have a jailbroken iPod device in just minutes! Visit: Can You Jailbreak iPod Touch
Subscribe to:
Posts (Atom)